
In the following step, you will learn how to make a Diagonal Wave Pattern in Adobe Photoshop. Here are the steps to make a Diagonal Wave Pattern in Adobe Photoshop, I will also leave the video below so you can have a better idea and see how I create Diagonal Wave Pattern.
How do you make new documents for patterns?
For creating a document hit on the File menu then select new, where width is 400 and height is 400 pixels, Resolution is 72 pixels, the color mode is RGB, and the background content will be white then click ok.
How do you create a Diagonal Wave Pattern step by step?
1.First, select the rectangle tool and draw a rectangle just like a line on the canvas. Set fill color mine is green and you can also choose a color you want.

Go to the layer panel and right click on the layer and duplicate it. Through the move tool place two layers side by side. Now select both layers and merge them.

Also read: https://texhype.com/how-to-create-polka-dots-patterns-in-adobe-illustrator/
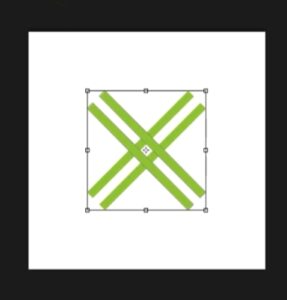
2. In this step press Ctrl+T and set the angle value it’s <45.

3. Now press Ctrl+A and align the shape in the middle of the canvas. Now go to the layer panel right click on the layer and duplicate it. Now press Ctrl+T and right-click on the shape here click on the flip horizontal option.
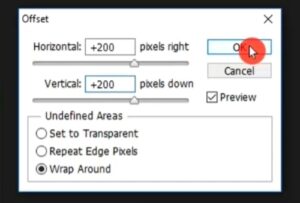
4. Select the filter menu and here select other then click on the offset. In the offset window Horizontal and the Vertical value will be 200/200 pixels (our canvas size is 400/400 so the offset will be half of that). Here the undefined area is Warp Around. then click ok.

Now go to the layer panel select both layers and rasterize them.
5. Now select the edit menu and hit on the defined pattern, give a pattern name that you want, and save it.
6. Now again create a new document where the width and height will be 1200/800 pixels, the resolution is 72, the color mode will be RGB, and the background content is white then click ok.
7. Now go to the layer panel unlock the layer and click on the create new fill and adjustment option in the layer panel, now here select pattern.
8. Now in the pattern fill window click the drop-down menu to select pattern and select the one which you recently saved. And set the scale it’s 40% and click ok.
Now the pattern is complete.