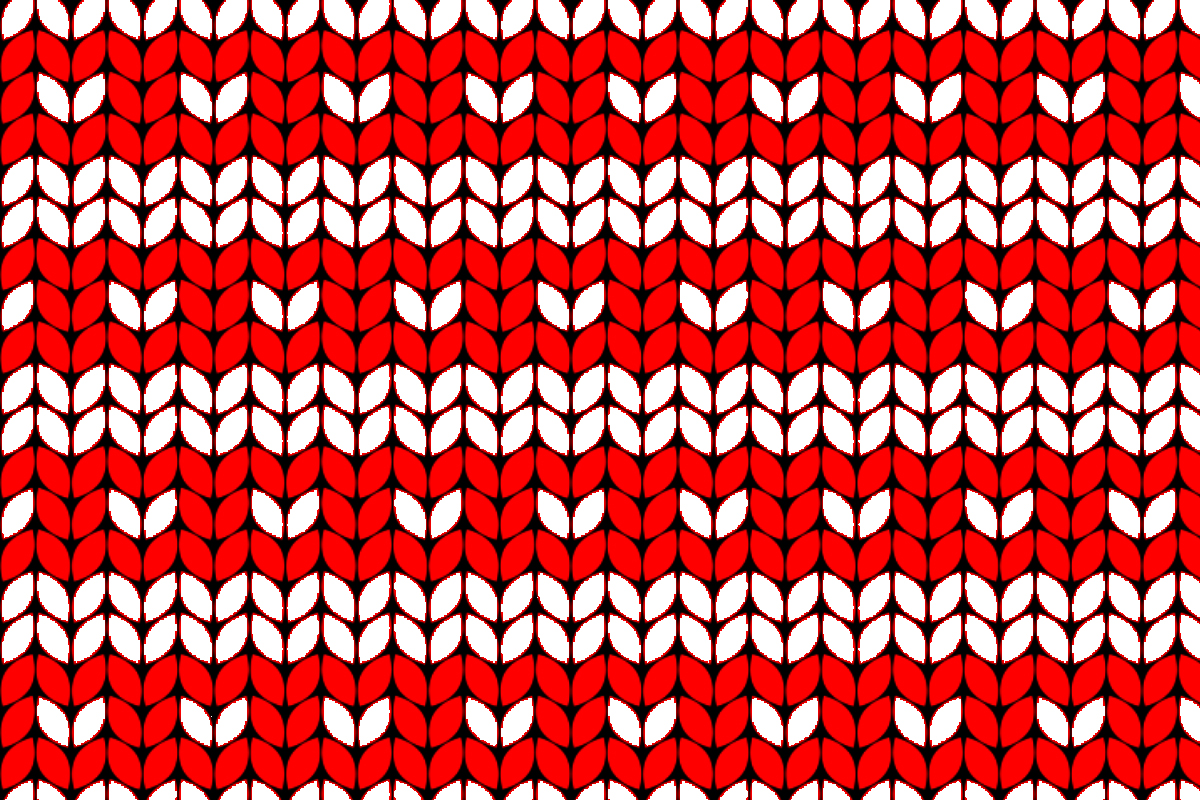
In the following step, you will learn how to make a Knitting Pattern in Adobe Photoshop.
How do you make new documents for patterns?
For creating a document hit on the File menu then select new, where width is 1200 and height is 800 pixels, Resolution is 72 pixels, the color mode is RGB, and the background content will be transparent then click ok.
How do you create the very first knitting shape?
1.First, select the ellipse tool from the rectangle tool, click on the canvas, and create the ellipse window set the width and height of the ellipse, where the width is 200px and the height is 400px, and click ok.

2. After creating the ellipse set fill the color as red and the stroke color will be black, here stroke width is 2pt.

3. Now go to the pen tool and here Select the convert point tool. Click on the top and the bottom point of the ellipse tool.

Also read: https://texhype.com/how-to-create-checked-pattern-in-adobe-photoshop/
4. Now set the angle value it’s <30°.

Now go to the layer panel and duplicate the layer. Click on the edit menu here select the transform path then click on the flip Horizontally.

5. After that select the move tool and place the shape side by side.

and here place a ruler guide vertically in the middle of both shapes.

6. Now select both layers and duplicate them two times, after duplicating move the shape one by one vertically down to the main shape.

And select all layers and merge them.
7. Now right-click on the layer and duplicate it. After duplicating place the shape horizontally side of the other one through the move tool and also here set a ruler guide in the middle of the shape.

8. Now placed two ruler guide horizontally for the repeated pattern area.

Hit on the rectangular marquee tool and select the guided area.
9. Now select the edit menu and hit on the defined pattern, give a pattern name that you want, and save it.
10. Now again create a new document where the width and height will be 1200/800 pixels, the resolution is 72, the color mode will be RGB, and the background content is white then click ok.

11. Now go to the layer panel open the layer lock and click on the create new fill and adjustment layer option, from here select pattern.
12. Now in the pattern fill window click the drop-down menu to select the pattern and select the one which you recently saved. And set the scale it’s 20% and click ok.

13. Now select the background layer and here fill black color in the background through the paint bucket tool.

14. For the knitting effect change some shape’s color, for changing the color click on the foreground color tool and select a color that you want. Then click ok. Through the paint bucket tool click on the knitting shape and change the color.

Now the pattern is complete.